7 APRIL 18 -
Hanif Rashid (0333455)
3D Modeling.
Week 2.
Before our 2nd week class start, Mr.Kanan give us a few video tutorial that produce by himself for us to familiarizes with the Maya software. Mr.Kanan told us also to start find a idea & inspiration for our 1st Assignment, which is creating a Hard Surface modeling.
For my 1st Assignment, i got an inspiration for creating a portable tower defense kinda vehicle type. But the process of finalizing is still in progress.
Mood board and Inspiration :
Week 2.
For this week class, we were given an introduction and tutorial for Maya software. Before we start our tutorial, Mr.Kanan given us a task to build a house using what ever knowledge that we have for the software. After that he guided us throughout the Maya tutorial and share some of the key shortcut.
This is the photo that Mr.Kanan provided us to created from scratch :
Image bellow is the 1st try on creating a house without any understanding of using Maya software properly.
For the 2nd image is where Mr.Kanan teach us using the basic tool of Maya for modeling which is image bellow. One of the most important tool that we will using is Multi-cut, Extrude and Bevel. I did found a helpful list from Maya Autodesk website.
Below is the 2nd tryout modeling by following the video that Mr. Kanan provided :
I decided to find a follow some of tutorial in Youtube to make myself familiar with Maya Autodesk :
For the 2nd video, a list of tutorial where i get my 1st assignment inspiration :
Week 3.
Idea Progression for Project 1 :
Mood board progression, i decide to go with a combination of Mammoth and Tank to produce my own version of tank called Ogre. Below are the sketches progress.
Early stage progression for modeling :

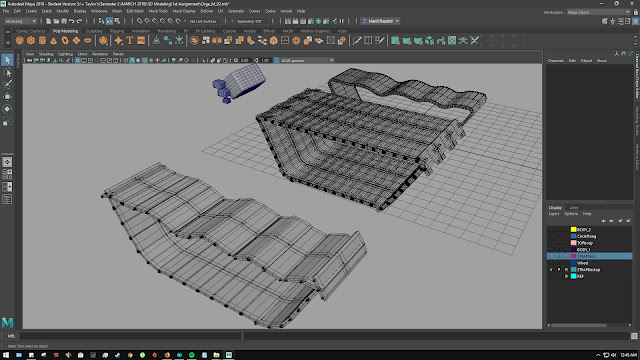
Modeling the Tank Tread for the 1st stage. As you can see on the 1st picture i try it out 3 times and
Up close the details for the final Tank Tread. 1st i draw curve to mimic the tank tread, then by using Mash to clip on 1 model of the tank tread and duplicated it all along.
Modeling for the Tank Wheel & Gear to put inside of the tank tread. Using cylinder as my basic shape.
Side view of the wheels and gears. I created one side and duplicate the other side.
More Details for the Wheel section.
Next i move on to the main body of the tank. For this part the details is still in the progress.
The circular shape represent the tank mechanism to turn around and a part to connect the upper part and the lower part of the body.
And finally rough view of the tank.
Week 4.
Progression for Assignment 1 :
Refinement on the lower part of the tank. From the 1st picture above :
- Refinement on the tank tread and gear.
- Start to put more details on the lower engine body of the tank which is the middle part.
- Shape refinement on the mid base body of the tank (pink wire frame)
Refinement for the mid body of the tank. From the 1st picture above :
- Shape and placement of the secondary cannon.
- After that mirror one side to another to make a symmetrical shape model.
- The small details for the secondary canon such as camera and sensory.
Refinement for the Head :
- This particular space is where the pilot will control the tank. Hence the level of advance system such as camera, motion sensor attach, Dual mini gun etc.
- Refinement on the small mini turret.
Refinement on the Main Cannon :
- Working on the details for the main cannon unit.
- Detail put on the cannon cylinder to make the main cannon more unique.
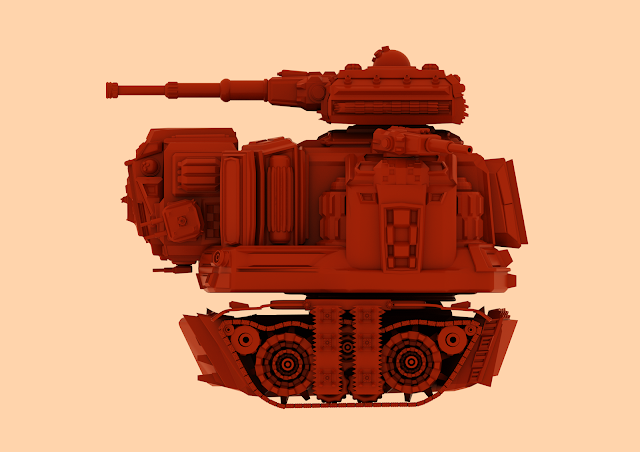
The final output of the tank. After finish and satisfy with the model, i decided to go with the name The Ogre, The Destroyer since the whole outcome of my tank screams aggressiveness. This tank is build purposely to do a aggressive combat and crush enemy.
Rendering Progress :
The next progression is putting the material and color. I decided not to put any texture 1st for the first assignment since it's okay not to put because 1st assignment is focusing on the modeling technique and skills. Not only material, this part of progression also where i explore which lighting is suitable with the model. Bellow are the result :
The result of selection material color, orange. For the lighting i decided to used the Maya Dome lighting which give the perfect soft light throughout the model. Since i didn't used any texturing on the model, i choose orange color for material color to break from typical mole grey scale color. Below are the close-up shoot of the model :
4 images below Front, Back, Side and Top.
For out final submission, we were task to create a poster to showcase our modeling. The creativity for the poster is up to each individual. i decided to used black and dark theme since i already used orange for my base model. The title is Ogre, The Destroyer.
Visit Behance
Final Poster :
Week 8.
Project 2 (Organic Modeling)
This exercise will focus on organic (curves and smooth surface) mesh building with the understanding of anatomy, muscle and proper mesh/topology flow implementation catering for rig setups and UVW Layouts for texturing. E.g. models – human, monsters, vegetation etc.
Mood board & Idea Progression for Project 2 :
Since for the Project 1, i created a menacing tank, i decided to try a different route for my project 2, a little bit of cute plus monster in the mixture with stylized modelling. I'm not sure how to produce this stylized modeling but i love to venture into it with Maya. I was inspired by this character called Sootie, which is side kicks for Rayman Adventures and i decided to choose this further my idea progression :
Above are the few idea sketches that have been developed. And bellow are the modeling progression :
After Showing to Mr.Kanan for my progress work, his concern is only the spiky part of the head, he told me maybe i will facing a lot of issue a long the way especially doing the texturing part. So his advice is to redo only the spike, simplify the spike BUT make the texture standout.
Progression for Project 2 :
After refining my model especially the main part of the body, i move on to the next step which is UV cut and mapping. This is the most challenging stage due to not find a proper tutorial on Youtube. After a few trial and error i decided to ask a senior and a friend of mine to teach me UV cutting and mapping in a easiest way possible and i did understand, finally. Bellow are the image process from UV cutting to texturing :
For the 1st image is the UV cut and mapping. I need to select the object on the 3d which is the left side, and it will project on the UV screen on the right side. The objective here is to cut the 3D object and make it flat as possible for the texture mapping. For the 2nd image is the after cut all the UV, and i need to check all the mapping in a correct scale and that's when the checked box play an important role to display how the texture will look like.
After i satisfy with my UV cut and mapping, i need to combine and export the model as object(OBJ) format. Reason is OBJ format is the most universal format for other software to read. Bellow are the image process :
This is what the model will look like after properly UV cut the model. One of the reason why it display successfully is because the program enable to read the UV mapping from the model. As you can see the left is where the model display and the right is where the UV mapping together with Shadow and default texture.
From the 1st image is where the process of putting the materials from the base to the finish. One of the benefit of using Substance Painter is there provide the smart materials. What does the smart materials do is detect the edges and cut from the UV mapping for example the rough edge. Second is where the layering works similar to Photoshop system and i can technically do a masking.
For the 2 image bellow is where i finalized the texture and display on a different lighting environment and i can see the lighting will effect differently on the different surface. I'm still in the process of figuring how to transfer the model texture from Substance Painter to Maya. But for now i'm quite please with the result base on Substance Painter. Bellow are the result :
The final output after edited and do refinement in Photoshop :
Week 11.
FINAL PROJECT (Theme Based Scene Creation)
For the final project, i was inspired by creating a stylized robot character combine with an organic modeling. The two element that i'm gonna used is maybe Cat and Robot. Bellow is mood board and inspiration :
Since we can choose freely between organic and hard surface, i decided to combine both element for my final modeling. My inspiration is that a robot with a cute animal head and this lead to 20 percent is organic for the head of the and 80 percent is hard surface. I decided to stick with robot due to the reason i didn't have a chance to UV map my 1st project, so by this time on wards i will carefully plans how to model my character at the same time try to push boundaries. Bellow are the initial sketches that i produce after gather all the inspiration image :
After showing to our lecturer, he's agree with the concept and idea so i proceed with the idea. Since the final project we are required to create a scene, i will improvise along the way since the base is easier to create. Bellow are the progress of the modeling from start, to UV cut :
After get the initial shape and block out, i move on into the detailing. Bellow are the progress :
And finally after the model is created, i start my base which is the model that will show that the model is in hangar currently on standby mode. Bellow are the base :
After i get the major modeling done and satisfy with the outcome, i do test rendering on maya 1st before start the UV cut and transfer to Substance Painter. Bellow are the outcome render using Maya :
The next step is export as OBJ and import to Substance Painter. This is where i do the texturing and make my model appear closely to my initial idea, in other words give a life to my model. Bellow are the progress :
And finally the final poster outcome :
After showing to our lecturer, he did commented on my overall pose, which is told me to give a little extreme pose, to show a warrior pose and finally tweak the foot so that it give more balance to the robot. So i do some tweaking and re-render, UV cut a little and painted again but this time with the base. so bellow is my progress :
After tweaking the pose and re-modeling the foot. i move to substance painter. Bellow are the progress :
And finally the Final Poster :
+


Comments
Post a Comment